SonarQube is a tool for static code analysis. Check out this short wiki article to get a general understanding of the tool. In addition to Wiki, I'll tell a bit more about SonarQube versions and plugins.
As a standalone app, SonarQube is available as the free community version and as 3 paid versions - developer, enterprise и data center. Besides, there is a paid SaaS solution - sonarcloud.io, which is free for public projects. So, if you own an open source project on GitHub, Bitbucket or Azure DevOps, I recommend you try it (I can publish setup instructions if you need them). By the way, here is a real example: the code of the site you are reading now is analyzed in sonarcloud.io - lean-delivery.github.io-src.
SonarQube provides about 20 out of the box plugins, mostly language ones. Their number may vary, depending on the version. Also, there are nearly 60 third-party plugins of different types:
- language - e.g. groovy, yaml
- external analyzers - e.g. checkstyle, findbugs, pmd, ansible lint
- integration - e.g. Gitlab and Bitbucket authentication
- code coverage
- localization and others
It’s important to mention that the free community version and free sonarcloud.io have different functionality. Here is their comparison:
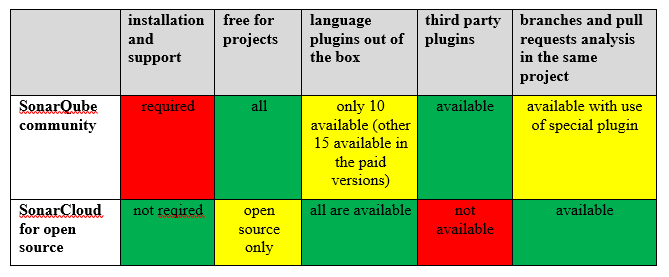
Further in the article we’ll take a closer look at the free community version. The latest versions - 7.9.2 LTS and 8.1.
Installation
There are several ways to install SonarQube.
- Manually. My advice – just don't waste your time on it.
- Get an official docker image on dockerhub. I don't use this method, but if you are interested, I can compare it with the next one.
- Install SonarQube with our ansible-sonarqube role.
Let’s explore the last approach. Look through the readme, get the playbook example and adjust it to your needs. The playbook will install SonarQube and everything required for its work: java (using our ansible-java role), postgresql database and nginx (for https).
The mentioned above java role can be used not only for SonarQube installation but in a lot of other cases as well. It's the best role of a lean-delivery project and the best java role on Ansible Galaxy. Pay your attention to the number of supported JDK/JRE types and number of supported platforms.
To install SonarQube you need an instance with at least 4 Gb memory – e.g. t3a.medium in AWS.
Note that besides the installation, the role can perform configuration actions:
- Migrate the database – it’s required when you already have SonarQube installed and are going to update it to a new version
- add Jenkins webhook (we’ll talk about it further)
- import custom quality profiles (also will be covered below)
- configure LDAP authentication
Configuration
The first thing you need to do is to change default password for admin in Administration > Security > Users. Here what happens when you forget to do it - UK cell giant EE left a critical code system exposed with a default password. By the way, we are going to add this configuration option to the role in the near future.
In addition to the password change, add a token for the admin user, you will need it later.
Now unauthorized users are not able to login with default admin/admin, but they’re still able to view your code as guest users. So, the next step is to close guest access in Administration > Configuration > Security > Force user authentication. This feature will be also added to the role.
If SonarQube access is required not only for you but for other team members as well, it makes sense to configure LDAP authentication (this option exists in the role) or authentication via GitHub, Bitbucket, Gitlab, etc.
Let's move on to setting up Quality Profiles. Every language plugin provides built-in quality profile – it's just a set of active and inactive rules, according to which your code is verified. Besides the rules, the profile may contain templates which you can use to create your own rules. Here is an example – a built-in Python profile (here and elsewhere I’ll give links to SonarCloud to illustrate the point I talk about, but in SonarQube it looks absolutely the same).
If you have custom profiles, you may import them right during the installation stage using our role and then manually set them as default. If you don’t, just leave everything as is – built-in profiles will be used by default. Most likely, later you’ll have to create custom profiles from built-in profiles when there will be a need to activate/inactivate rules or change their settings.
Let’s talk more about Java profiles. There are 4 up-to-date Java plugins:
- out of the box sonar-java-plugin with Sonar way profile, which is used by default
- third-party sonar-findbugs-plugin with 4 profiles
- third-party sonar-checkstyle-plugin without profiles
- third-party sonar-pmd-plugin without profiles
If you install all 4 plugins and leave Quality Profiles settings without changes, then only the Sonar way profile will be used for java code verification - in other words, you will use the out-of-the-box plugin only, while the other 3 will stay unused. To use all 4 plugins for verification I usually create a custom profile that includes the rules from all 4 plugins. We are planning to add this custom profile to the role.
Let me point out another important thing about custom profiles. When you update a plugin and this update contains new active rules, make sure the rules are activated in custom profile as well, otherwise the update won’t make any difference. You may do it this way. After the plugin gets updated, go to 'Rules', select 'Available Since' filter and set the current date. Then in 'Quality Profile' filter select 'built-in' and 'custom profiles' one after another. The number of new active rules should be the same. It there are no new rules in the custom profile, activate them manually.
The next step is Quality Gates setup. It's a set of metrics, according to which code verification is either successful or failed. Default quality gates contain code coverage percentage, duplication percentage, and Maintainability, Reliability, Security ratings. I usually use a simpler custom set, as not every project has the code coverage and not every team has the capacity to fix non-critical issues. In such cases ratings are not required and it's enough not to miss out blockers, criticals (or sometimes majors). We plan to add the possibility to import custom quality gates to the role.
Then you need to bind SonarQube to your CI tool. In this article, I'm going to use Jenkins. Firstly go to Administration > Configuration > Webhooks and add Jenkins webhook (this step can be done by the role). Secondly, in Jenkins you need to install SonarQube Scanner plugin, add SonarQube Server in Manage Jenkins > Configure System and set:
- name (any name, it will be used later in the pipeline)
- SonarQube url
- token you've added for admin user
An important note about the url. If you use https, there are 2 possible options. If you have a valid certificate you need to preliminarily set it in SonarQube playbook (because the self-signed certificate is used by default). And if there is no valid certificate and you use a self-signed one – you need to import it to Java that Jenkins is running on.
By the way, for Jenkins installation, I would recommend our ansible-jenkins role, which may also install the already mentioned plugin and add SonarQube Server in the settings. In the future, we’ll publish a playbook that can install Jenkins + SonarQube pack and set the certificate correctly.
Sometimes instead of the plugin they use a separately installed sonar-scanner and pass scan parameters in the sonar-project.properties file. In my opinion, it's more convenient to use the plugin and set scan parameters directly in the pipeline.
Pipeline
Let's explore the case when you've got a repo with a code and use simple git flow: there is the main branch (develop/master), developers add a new code to the feature branches and open pull requests to the main branch. You would like to use SonarQube for verification of both the main branch and pull requests (and maybe some other important branches). Mind that the free community SonarQube version lacks one important feature that is available in paid versions and in SonarCloud – analysis of branches and pull requests in the same project. In other words, in paid versions and in SonarCloud a single project corresponds to one repo and contains info about all verified branches and pull requests. Here is an example:
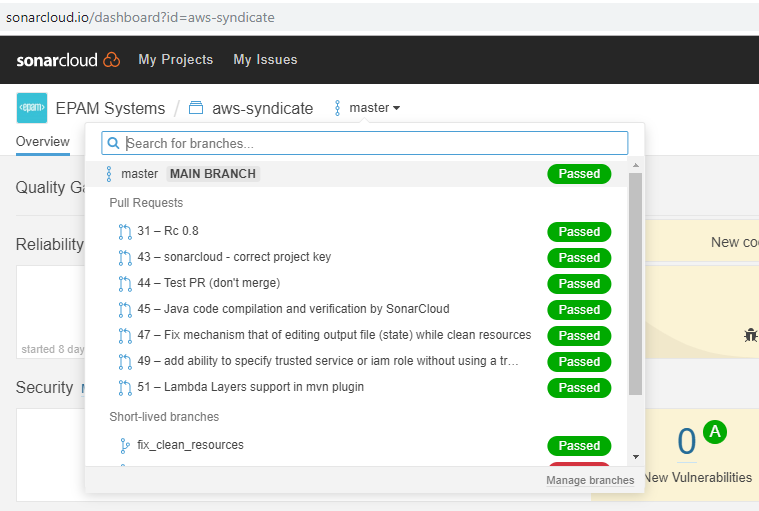
In the free version multiple projects correspond to one repo because you have to create separate projects for the main branch and for every pull request. It's fairly inconvenient, firstly because new pull requests are constantly coming up - at some point you’ll have to think about auto-deletion of old projects. Secondly, if you have more than one repo to verify, there will be a mess. Fortunately, there are two more convenient ways to organize pull requests verification using special plugins. The first (old one) works for SonarQube 7.6 and lower and not for all repositories:
- for Github – doesn't work, sonar-github-plugin is no longer supported starting from SonarQube 7.2. Most likely it should work with 7.1, but it's quite outdated, so you will not be able to install the latest versions of language plugins.
- for Bitbucket Server – works with use of sonar-stash-plugin
- for Bitbucket Cloud – works with use of sonar-bitbucket-plugin
- for Gitlab – works with use of sonar-gitlab-plugin
- for Azure DevOps – doesn't work, there is no plugin for it
The idea of the first way is to go without creating projects for pull requests at all, but display info on all the found issues directly in the pull request. The name of this feature is pull request decoration and that’s how it looks like:
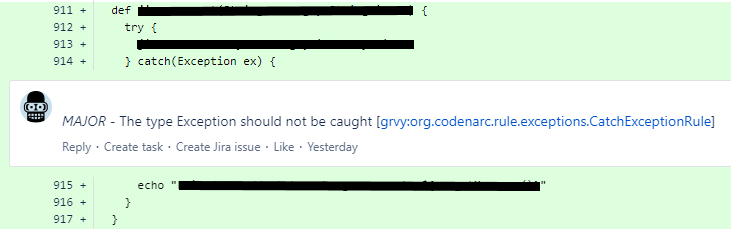
This is super convenient because you see a comment with the error message under every bad line of the code. Also, there is a link to SonarQube rule where you may find information on how to fix the error.
The second way is to use new sonarqube-community-branch-plugin, which allows to analyze branches and pull requests in the same project like SonarCloud or paid SonarQube. There are two limitations for the current version 1.2.0: latest SonarQube version 8.1 is not yet supported, pull requests decoration is not yet available. It looks like both of them will be gone in the next release. But if you don’t want to wait and need pull request decoration right now you may build a plugin yourself.
Here you may find the pipeline to run SonarQube analysis, it contains stages for both ways.
How to start using it on your project
First, add SonarQube analysis step to the main branch build and make sure it won’t fail by removing all metrics from Quality Gates.
A project with the main branch analysis result will appear in SonarQube. Very often you may find tons of issues there - it's impossible for developers to review all of them. This is especially true for huge repositories of monolithic applications. In such a case try to switch off the rules that generate issues for almost every file in the repo, or try to change their threshold if there is any. To see what rules generate the majority of issues, go to the issues list in the project and open Rule filter.
For example, you have 1000 source files in your repo and SonarQube shows "line too long, more than 80 chars" issue for each of them. It's unlikely that anyone will ever fix this. It's better to disable the rule or change its threshold. The idea is to leave unique issues only, those that relate to some repository files, but not to all of them. Make sure to inform the dev team what rules you’ve switched off or changed, perhaps they will want to get back some of them.
Ask the dev team to review found blockers and switch off the rules for those of them that aren’t going to be fixed, then ask to fix all the rest. On top of that, ask to review blocker rules switched off by default - perhaps developers will want to switch some of them on. Agree that blockers are no more allowed in the main branch. To do this add 'Blocker issues is greater than 0' condition to Quality Gates. Now if a blocker appears in the main branch, then build will be failed. If a blocker is found in the pull request, its verification will be failed as well. If possible, it’s better to block the merge button in case of a failed check.
Once blockers are covered, you may run the same iteration for criticals, majors and so on. Then you may also propose to the dev team to keep code coverage at a certain level. It could be done by adding a respective condition to Quality Gates.
If new active and inactive rules appear after plugins update, don't forget to ask the dev team to review them. Maybe they will want to switch on/off some of the rules.
In the pipeline you might notice a COMMENT_SEVERITY parameter. It sets minimal severity of issues to be followed with inline comment (e.g. critical+ or major+). If you have a lot of issues in the main branch, I wouldn’t recommend setting this parameter to MINOR or INFO, otherwise you will face the hundreds of minor issue comments in every pull request. If you are on blockers iteration, set this parameter to CRITICAL, for example. It means that blockers are commented and not allowed, while the criticals are still allowed but commented anyway.
One more piece of advice for you: check not only the dev team code (backend and frontend) with SonarQube, but DevOps code as well - use python, groovy, ansible, shellcheck plugins for this purpose.
What is missed in the article
How to add code coverage statistics to SonarQube. OWASP plugin. How to link SonarQube to other CI: Bamboo, Azure DevOps. How to verify maven, gradle and other projects with SonarQube. How to resolve SonarQube issues quickly using Sergey Podolitsky’s approach. Stay tuned and read about all these in the next chapter on lean-delivery.com only.
Special thanks to Alena Kalionava and Ivan Bogomazov.